How To Download YouTube Videos Without Any External Tools?

How To Download YouTube Videos Without Any External Tools

How To Download YouTube Videos Without Any External Tools?

How To Download YouTube Videos Without Any External Tools

YouTube is the one of the most popular video platform in the world. According to Wikipedia, YouTube has monthly 800 million visitors. More than 4 billion videos are viewed each day.

Downloading the YouTube videos are very common in these days. But YouTube doesn’t provide any default option to download YouTube videos directly. There are many sites, extensions, Software and tricks for downloading the YouTube Videos.

How To Download YouTube Videos Without Any External Tools?

Method 1:

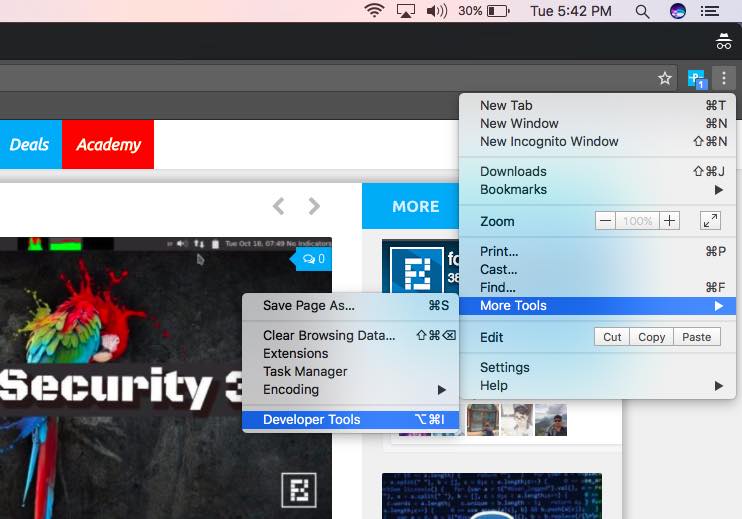
Step 1: Open the Developers tools in the browser and go to “Network.” If you are using Mozilla Firefox then use combine with “Ctrl+Shift+Q.”

Step 2: Now, click on “Media” in the “Network tool,” here you will see the HTTP requests made to media files, like audio and video files.

Step 3: Open any YouTube Video in browser, which you want to download. You will see the requests made by the YouTube Page to be audio &video files in the “Network tool.”

Step 4: Drift the cursor over the type column of each request in tool and look the media type:

  • If you want the audio, look for “audio/mp4”.
  • If you want the video, then look for “video/mp4”.

Step 5: Now, you will see “googlevideo.com” domain, click on it and copy the URL of the video, and open this video in the browser.

Step 6: Now, the video or audio will open in browser, right click on the page and select “Save As” to save the file.

How To Download YouTube Videos Without Any External Tools

Method 2:

Step 1: Open any YouTube Video in Browser, which you want to download.

Step 2: Now, you’ll see “www.youtube.com/watch?v.”

Step 3: Now, remove the “ube” from the “www.youtube.com/watch?v….” And press enter.

Step 4: You will see the “Record MP4/Mp3” option, select Mp3/Mp4 which you want to download. And click on the “Record MP4/Mp3” button, your video will be starting the download.

How To Download YouTube Videos Without Any External Tools

Hope you liked this tutorial. Leave a comment below if have any related issue with this. Don,t forget to share this post with friends.


Just Pressing Shift+F10 During Windows 10 Update Makes Your PC Super Easy To Hack

Don’t leave your machines unattended during the update.

shift-f10-hack-windows-10

Short Bytes: A security researcher named Sami Laiho has found a simple flaw in the Windows 10 update procedure that can let a hacker bypass BitLocker and access elevated Command Line. To do so, one needs to hold Shift+F10 during the update process. Laiho advises the users to avoid leaving their PCs unattended during the update process.

By taking the advantage of an underlying bug in the new build of Windows 10, an attacker can access an elevated Command Line interface in the Windows Preinstallation Environment by simply holding Shift+F10 during the update process.As the Command Line interface grants the administrative privileges, the hacker can access the computer’s hard drive by automatically bypassing BitLocker encryption–a feature that’s supposed to add an extra layer of security to your personal files.. This is possible due to a troubleshooting feature that lets one press the key combination to open the interface.

Explaining the bug, in his blog post, security researcher Sami Laiho writes that when a new build is being deployed, BitLocker is suspended. Thus, the TPM and password checks are both bypassed.

This bug not only affects the PCs running insider builds of Windows 10, but also the systems updating from Windows 10 RTM version to November or Anniversary update.

This flaw has been present in Windows 7 and 8 versions as well, but it has come into the limelight after Windows 10 in-place upgrades.

Here, the real issue is the privilege escalation that takes a non-admin to system, even with BitLocker enabled. This becomes scary when an attacker just needs to wait for the next upgrade on an unattended machine.

To tackle this situation, there is a simple solution that tells you to don’t allow unattended upgrades and keep a close eye on your PC. Until a fix is offered, one can also choose to stick to LTSB version of Windows 10 for now.

You can read more about the flaw exploitation and watch its video on Laiho’s blog.

Windows 10 in-place upgrades make this Issue Easy to Exploit

If your computer’s security relies on Windows BitLocker Hard Drive Encryption software, then Beware! Because anyone with physical access to your PC can still access your files within few seconds.

All an attacker need to do is hold SHIFT+F10 during Windows 10 update procedure.

Security researcher Sami Laiho discovered this simple method of bypassing BitLocker, wherein an attacker can open a command-line interface with System privileges just by holding SHIFT+F10 while a Windows 10 PC is installing a new OS build.

The command-line interface (CLI) then grants the attacker full access to the computer’s hard drive, even when the victim has enabled BitLocker disk encryption feature.

Laiho explains that during the installation of a new build (Windows 10 upgrade), the operating system disables BitLocker while the Windows PE installs a new image of the main Windows 10 OS.

“The installation [Windows 10 upgrade] of a new build is done by reimaging the machine and the image installed by a small version of Windows called Windows PE (Preinstallation Environment),” Laiho says in his blog.

“This has a feature for troubleshooting that allows you to press SHIFT+F10 to get a Command Prompt. This sadly allows for access to the hard disk as during the upgrade Microsoft disables BitLocker.”

Windows 10 in-place upgrades make this Issue Easy to Exploit

The SHIFT+F10 feature has existed with earlier versions of Windows as well, and could also be used to bypass BitLocker on Windows 7 and 8, but the feature has become a real flaw only with the advent of Windows 10’s in-place upgrades.

The attacker needs physical access to the target computer during a relatively short time frame, bypass BitLocker encryption, and then gain administrator access to the device – the issue that may also affect Internet of Things (IoT) devices running Windows 10 as well.

Why is this worrying? Most of you have a bad habit of leaving your PC unattended during the Windows OS update procedure. It’s also because Windows updates take very long to get installed.

During this time, any insider or threat actor (known or unknown to you) can open the CLI debugger interface and perform malicious tasks with the user admin privileges, despite BitLocker’s presence, and that too without the need of any additional software.

“The real issue here is the Elevation of Privilege that takes a non-admin to SYSTEM (the root of Windows) even on a BitLocker (Microsoft’s hard disk encryption) protected machine,” Laiho adds. “And of course that this doesn’t require any external hardware or additional software.”

During his tests, Laiho successfully brought up the CLI troubleshooting interface while performing an update from Windows 10 RTM to version 1511 (November Update) or version 1607 (Anniversary Update), and during updates to any newer Windows 10 Insiders Build, up to the end of October 2016.

You can also watch the video demonstration of this attack on Laiho’s blog.

Laiho informed Microsoft of the issue, and the company is working on a fix.

How to Mitigate this Issue?

As some countermeasures, Laiho recommended users not to leave their PCs unattended during the update procedure.

The Windows security expert also advised users to remain on Windows 10 LTSB (Long Time Servicing Branch) versions for the time being, as the LTSB versions of Windows 10 does not automatically do upgrades.

Windows 10 users with System Center Configuration Manager (SCCM) can block access to the command-line interface (CLI) during Windows update procedures by adding a file name DisableCMDRequest.tag to the %windir%\Setup\Scripts\ folder.

How To Find If Someone Logged Into Your Windows PC At A Given Time?

windows-10-pc

Short Bytes: Do you ever wish to know if someone used your Windows computer without your permission? Few people know that an inbuilt utility named Event Viewer can help them out and tell lots of information like the start-up and shutdown time of their computers. To do this, one simply needs to open Event Viewer and filter the logs to see the required details.

Very often we share login credentials of our Windows PCs with others, just to let them access it for a limited period of time or due to some other unavoidable reason–and forget to change the password. Without a doubt, it’s a very poor security practice.

This also makes us wonder how can we know if something is being done to our computers in our absence. To accomplish this task, one can use the inbuilt Windows Event Viewer feature. It’s useful for system error logging, warnings, and informational events etc. However, very few people know about it.

Whenever a Windows user starts a program on a PC, it posts a notification in an Event Log. It also records every hardware glitch, driver issue, security changes, system access, etc. It’s basically a database that keeps recording all the significant system activities in the form of simple text files.

In this article, I’ll tell you how to find if someone logged into your computer at a given time.

How to start Event Viewer in Windows PC?

To start Event Viewer in your Windows 7 and 8.1, you need to click the Start Button and open the Control Panel. Now find the System and Maintenace option and click on it. There, you’ll find Administrative Tool which will contain Event Viewer.

On Windows 10, one can simply type Event Viewer in the desktop search box. Alternatively, one can use Windows+X+V key to launch the program.

Another way to open the Event Viewer to find if someone logged into your computer at a given time is by using the Run dialog. To do this, press Windows+R key. It will open Run dialog. Now type eventvwr and click OK.

How to find if someone logged into your computer without permission?

Now, after opening Event Viewer in your Windows PC, you need to locate Windows Logs > System. In the middle pane, this will open a list of the events that took place when Windows system was running. The events might take a couple of moments to populate.windows_10_event_viewer_1Here, click on any row in the middle pane to open a new pop-up with the information about that particular event. Now, to find out if someone logged into your PC, you need to sort this data.

To do this, click on the Filter Current Log button in the right pane. Firstly, make sure that Event logs field shows System. Secondly, make sure that User field shows <All Users>.windows-event-viewerAs shown in the screenshot, enter event IDs 6005 and 6006 in the empty field. This will filter the System events.

You can see the start-up and shut down time in the Date and Time column. Here, Event ID 6005 means “The event log service was started” (i.e. start-up time) and 6006 means “The event log service was stopped” (i.e. shut down time).use_event_viewer_windows_10You can also use the Custom view option if you wish to check this data regularly.

Did you find this tutorial on how to use Event Viewer to find if someone used your computer without your knowledge helpful? Don’t forget to drop your feedback in the comments section below.

How To Enable/Disable Secure Boot In Windows 8, 8.1, And 10?

what-is-secure-bootShort Bytes: Windows 8 and later versions of Windows come with UEFI Firmware settings which allow a user to disable any external intervention via USB, external drive etc. This is called Secure Boot option in Windows 8 operating system. Disabling the secure boot option in the Windows 8, or later, can help you interfere externally with your Windows and install operating systems other than Windows.

Sometimes, we want two operating systems to run on our PCs--Windows and Ubuntu, or Windows and Fedora. If the secure boot option is enabled on your computer, it might not allow booting two operating systems. So, you need to disable secure boot on your personal computer in order to do some external intervention in Windows.Secure Boot option is integrated with BIOS of your PC. So, in short, you need to restart your PC in the BIOS mode and change the secure boot option there. Here’s how to do it–

What is the secure boot?

In simple terms, disable secure boot option does not prevent Windows from booting two operating systems, booting from an external drive, or booting Windows in some specific ways for providing security to Windows against unauthorized devices.

The secure boot option started to come with Windows 8 and later versions like Windows 8.1 or Windows 10 when Windows began coming with UEFI firmware instead of BIOS.

Here are some conditions that would be allowed on your PC after disabling Windows secure boot option:

  • Booting Windows on your PC from an external device like USB or CD.
  • Dual OS booting like Windows with Linux, Ubuntu or Fedora.
  • Booting Windows using Windows password recovery tools
  • Running the previous versions of Windows etc.

How to disable secure boot in Windows 8 to Windows 10:

Disabling the secure boot in Windows follows the same procedure from Windows 8 to Windows 10 and here are the steps that you need to follow:

  • Search Advanced startup in the search option at the taskbar of the Windows. Then, select Change advanced Startup Options as shown below in the snapshot.

Advanced startup option in Windows 10

  • Once you click on the “change advanced startup options”, the following screen will appear. You just have to click Restart nowunder the Advanced startup.

Advanced startup

  • The above command will restart your PC in the advanced mode which comes with lots of advanced options to let you configure your Windows. Some of the advanced options are using an external device, troubleshooting your Windows using advanced options, or resetting your PC etc. The screen appears something like this. Click on Troubleshoot.

secure boot windows1

  • You can see above that Troubleshoot option had two options–Reset your PC and Advanced options. So, once you click on Troubleshoot, you will the same two options coming up. Click on Advanced options as shown below.

secure boot windows2

  • The advanced options look something like this (as shown below). Select UEFI Firmware Settings. 

  • Once you click on the UEFI firmware settings, it will restart your system once again or ask you to restart the system. So, click on the restart in the next screen.
  • However, this restart will start in BIOS and you will see different BIOS setup.

secure boot windows3

  • Click on the security tab under the BIOS settings.
  • Use the Up and Down arrow to choose the secure bootoption as shown in the previous image.
  • Select the option using Arrows and change the secure boot from Enabled to Disabled. 
  • Press Enter
  • Save your work and exit.

Since the secure boot is now disabled, you can easily boot your devices with any external or unauthorized device.

If you want to enable the secure boot option once again on your PC, follow the same steps as mentioned above and in the BIOS security settings, change the secure boot option from Disabled to Enabled.

“Gooligan” Malware Hacks 1 Million Google Accounts, Here’s How To Check If You’re Affected

gooligan-malware

Short Bytes: A new Android malware, named Gooligan, is here to compromise your Google accounts. It steals the account authorization keys and installs malicious adware on devices. With a 1 million infected devices, Gooligan continues to infect 13,000 new devices each day. Check Point has released an online tool to check if your Google account has been compromised by this dangerous malware.

Reputed security firm Check Point has found a new malware in the wild that’s being exploited to hack the user accounts of Google users. This attack has been named Gooligan and it has already breached the security of more than 1 million Google accounts.

The researchers have published a blog post detailing how Gooligan malware roots the infected devices and steals authorization tokens. As a result, the attacker can access a user’s various Google accounts like Gmail, Play, Photos, Docs, Drive, etc.

How does Gooligan compromise Google accounts?gooligan-malware-working-1

Gooligan is chiefly spreading through infected Android applications. Once it finds its place on an Android device, the malware sends data about the device to its Command and Control (C&C) server. It’s followed by the downloading of a rootkit from C&C server. The payload roots the device and the attacker gets unrestricted remote code execution access to the device

After rooting, Gooligan downloads a new module that injects code into Google Play or Google Mobile Services to impersonate the user behavior. Ultimately, this module steals Google account authentication and token information. Gooligan also installs apps from Play Store and rates them to improve their ranking. Another notorious activity performed by Gooligan is the installation of adware to generate revenue.

INFECTED VERSIONS ARE ANDROID JELLY BEAN, KITKAT, AND LOLLIPOP

This way, malware continues to infect 13,000 new devices each day.

The potentially infected Android versions are Android Jelly Bean, KitKat, and Lollipop — a group that accounts for about 75% devices in the market. Out of these, 57% devices are located in Asia and 9% are in Europe.

How to check if Gooligan has compromised your Google account?

Check Point has released an online tool that lets you check if your Android smartphone has been infected. Simply visit https://gooligan.checkpoint.com/ and enter your email account to perform the security test.

Just in case your device has been breached, you should perform a clean installation of your mobile OS or ‘re-flash’ it. Also, it goes without saying that one should change the Google account passwords immediately.

Check Point has informed Google Security team regarding this malware campaign and they’re working to investigate the issue.

Did you find this article on Gooligan malware helpful? Share your feedback in the comments below.

Which Is The Most Complex Programming Language?

learn-to-code-perfect-programming-languageShort Bytes: Very often we talk about the most popular and most loved programming languages, but we skip the discussion dealing with the most complex programming languages. Here’s an infographic that outlines the complexities in JavaScript and other modern programming languages.

Everybody dislikes complex code as it’s hard to understand and maintain. You can make your code more readable by reducing the number of parameters, number of statements in your function, and the number of nesting.

While JavaScript continues to rule the web as the most popular programming language among developers, it’s a widely known fact that it has a code complexity problem. Fortunately, we have enough tools to detect complex code and block it.

This notion was again confirmed recently in a study that programming languages like JavaScript and Python are more complex than you think. If we define complexity as the average percentage of code that’s deeply nested — 4 times or more — in each project, JavaScript turned out to be the most complex language, followed by PHP, Java, C#, and Python.

Apart from the complexity factor, Serene analyzed over 400 billion lines of code and looked for other factors like ‘which language do programmer need the most help with’ and ‘which programming languages are least expressive’. Once again, JavaScript turned out to be the most complex programming language.

While many people could deny the methodology of Serene, the results are interesting and worth a discussion.

Take a look at the infographic below:

Which Is The Most Complex Programming Language? JavaScript or Python?

most complex programming languages

Take a part in the discussion below and let us know which programming language is most complex according to you?

If you are interested in learning to code, we have some interesting deals in our store.

Chrome’s Hidden Reload Menu: “Normal Reload”, “Hard Reload”, and “Empty Cache”

google-chromeShort Bytes: Do you know about the “Normal Reload”, “Hard Reload”, and “Empty Cache with Hard Reload” option in your web browser? These options allow one to ensure that locally cached files aren’t served after reloading the page. It can be easily accessed by opening the developer tools option from the Chrome Menu.

If you visit fossbytes.com often, there are chances that the website loads faster for you as compared to the first time visitors. This happens due to the browser cache feature that automatically saves the image, JavaScript, and CSS files etc. in the local cache. A webmaster has the option to specify the expiration date so that your browser will load the latest version. The web browser cache is a useful function that allows the user and server to save bandwidth and time. It also makes the user experience better.

chromes-hidden-reload-option-1

However, this causes problems when some bad results are cached. It doesn’t allow your computer to convey the communication to the host directly. In such cases, we try to reload the web page or clear the cache.

In web browsers, Google Chrome, for instance,  you have the option to clear cookies, Adobe Flash cache, and temporary internet files. In Chrome’s developer tools option, you have a hidden feature to clear the cache, perform a soft/normal reload, hard reload, and empty cache with hard reload.

Below is the screenshot of these options:chrome-developer-option-rename-1

These options, usually their shortcuts, are of great use to web developers. While they might be already aware of these tools, it could be another tech tip for the regular users.

To access this drop down menu, you need to open the Developer Tools console in your Google Chrome web browser. To do this, you need to find the Developer Tools option in Chrome’s menu. Follow this path: Chrome Menu → More tools → Developer Toolschrome-developer-options

Now, right-click on the Reload button of your web browser in the upper right corner. It’ll show you the three types of reload options.

Here are their functions:

  • Normal Reload: Reloads the page and serves the cached content (F5)
  • Hard Reload: Reloads the page and forces the browser to download items. Cache data might appear (Ctrl+R, Ctrl+SHIFT+R, or Ctrl+F5)
  • Empty Cache & Hard Reload: Page’s cache is cleared completely. Everything is downloaded from the scratch.

When should I use hard refresh option?

Sometimes when a change is made to a website, it doesn’t appear immediately. A hard reload will make things okay. However, if you wish to reload a web page completely, the option to clear the cache and reload the page from the scratch should be used.

Did you find this article interesting? Don’t forget to drop your feedback in the comments section below.

What Is The Difference Between Google Chrome And Chromium Browser?

chrome-vs-chromium-difference

Short Bytes: Google Chrome is a web browser developed and maintained by tech giant Google. Chrome uses the open source web browser Chromium’s source code and adds a bunch of features developed by Google and some nonfree components.

Chromium is an open-source web browser developed and maintained by The Chromium Project. The git rolling release web browser was first introduced in 2008 and its different parts are released under different free software licenses which include BSD License (for the portion written by Google) and MIT License, LGPL, etc for other portions.Google Chrome, also released in 2008, is a proprietary web browser developed and maintained by Google. The reason why Chrome and Chromium are tied to each other is that Chome borrows Chromium’s source code. You can differentiate Chrome and Chromium by looking at their logo, Chrome is colorful and Chromium is blue. However, that’s not the only difference between Chrome and Chromium.

Difference between Chrome and Chromium:

Automatic Updates

Chrome uses GoogleUpdate on Windows (GoogleSoftwareUpdateAgent and GoogleSoftwareUpdateDaemon on Mac) to automatically update to the latest version. It is not available for Chromium. On some Linux distributions, updates are made available via package repositories. Google Update is also used for other applications like Google Earth.

Usage tracking and crash reporting

Unlike Chromium, Google has added the crash reporting and send usage statistics options. Chrome sends data to Google servers. It includes general data like information about your device and OS, Chrome settings, visited websites having malware, search queries, etc. This allows Google to suggestions, results, and ads that are relevant to you.

Crash reporting and usage tracking can be disabled from Chrome’s settings.

Chrome Web Store

On Google Chrome, the functionality to add extensions outside the Chrome Web Store is disabled on all Windows and Mac Channels. However, the extensions can be added via developer mode.

Media Codec support

Chromium’s HTML5 audio/video codec support is limited to what is available as non-proprietary codecs like Theora, Vorbis, WebM, VP9, etc. In the case of Chrome, it adds support for some non-free stuff like AAC, MP3, and H.264 (now free).

Non-optional tracking

Google Chrome installer includes a randomly generated token. The token is sent to Google after the installation completes in order to measure the success rate.

Google also uses the RLZ identifier to track a user while Google search and using the address bar. The RLZ identifier stores information – in the form of encoded strings – like the source of chrome download and installation week. It doesn’t include any personal information and it’s used to measure the effectiveness of a promotional campaign. Chrome downloaded from Google’s website doesn’t have the RLZ identifier. The source code to decode the strings is made open by Google.

Sandbox

Both Chrome and Chromium have Sandbox support. It is always enabled in the case of Google Chrome. For Chromium, some Linux distributions may disable the Sandbox feature.

Adobe Flash Plugin

Although, this difference between Chrome and Chromium doesn’t matter much as Adobe Flash is being phased out for the newer HTML5. Google Chrome supports a Pepper API version of Adobe Flash which gets updated automatically with Chrome. Since it’s not open source, Chromium doesn’t support it out of the box like Google Chrome.

Also Read: How To Use These Simple Google Search Tricks And Search Like A Boss

Chrome Vs Chromium: Which one is better?

It’s hard to decide which one to choose between the open source Chromium and feature rich Google Chrome. For Windows, it is better to use Google Chrome as Chromium doesn’t come as a stable release. And that applies for MacOS too.

In the case of Linux, known for its love for free and open source software, Chromium might be a better option. But you’ll have to live with the fact that it doesn’t update automatically, lacks Adobe Flash plugin and other media codecs. However, various Linux distributions may offer a modified Chromium adding various missing features. In fact, Chromium is now being considered as the default web browser in the many distros on the likes of Mozilla Firefox.

Google Chrome is also available for Linux and it is a good option if you are fine with some closed source cheese spread on your open bread.

Download Chrome and Chromium

You can download Chrome from the official download page provided by Google using this link:

Supported platforms: Windows, MacOS, Linux, Android, iOS

You can download Chromium using this official download page:

Supported Platforms: Windows, Mac, Linux, Android

Di you find this helpful, tell us in the comments below.

Google Releases App Maker — Now Build Apps Easily Without Coding

google-app-maker

Short Bytes: To convince more businesses to use its productivity software collection G Suite, Google has launched App Maker. It’s focused on the enterprises for building customized apps without heavy coding and infrastructural needs. Google App Maker is available for the members of Early Adopter Program for G Suite Business.

Google has announced the launch of App Maker. It’s a new service that’s a part of Google’s G Suite, formerly called Google Apps. With this development tool, Google wishes to let the enterprises and businesses make custom apps to suit their needs.Google App Maker, a new player in the low-code, drag-and-drop app building market, lets one build an app with material design compliant UI and gather the data from different G Suite apps, Contacts, Groups, Maps etc.

The apps build using these App Maker don’t need separate infrastructure. Instead, they use the same infrastructure that’s used by G Suite apps. So, the users will be able to enjoy a serverless infrastructure and ditch the need of a dedicated developer. After the app goes live, one can monitor its statistics in Google Analytics.

GOOGLE HAS MADE ITS OWN 300+ APPS WITH APP MAKER

While one doesn’t need much coding knowledge to accomplish things via App Maker, Google allows further customization using HTML, CSS, JS, and JQuery content.

Google App Maker is based on the technologies that Google has already used to make its own 300+ apps.

Learn to build mobile apps with Fossbytes Academy

Google’s App Maker will directly compete with other low-code app making tools like App Cloud, PowerApps Mendix, Appian, OutSystems etc.

At the moment, Google App Maker is available for the members of Early Adopter Program of G Suite Business. Just in case you wish to enroll in this program, follow this link.

In other related news, Google has added seven new apps in its G Suite program. The new additions are Asana, DocuSign, Freshdesk, LumApps, Virtru, Xero, and Zoho Invoice.

Did you find Google App Maker helpful? Share your views in the comments section below.